

Hardware components | ||||||
 |
| × | 1 | |||
_ztBMuBhMHo.jpg?auto=compress%2Cformat&w=48&h=48&fit=fill&bg=ffffff) |
| × | 1 | |||
 |
| × | 1 | |||
Software apps and online services | ||||||
| ||||||
 |
| |||||
See our full guide here and check out BreakoutBros.com for more.
Previously we looked at how to connect and program an Arduino with the PocketCHIP over a serial USB connection. Today the goal is to connect a PocketCHIP to an Arduino using a HC-05 Bluetooth module.
Bluetooth communication through a HC-05 Bluetooth moduleThe HC-05 is a Bluetooth module that can communicate with an Arduino over a Serial connection. It can be used as a Master or a Slave module. To get the HC-05 configured we are going to use the Arduino's SoftwareSerial.h library. First connect the HC-05 to the Arduino on the following pins:
- STATE-3.3V (connect then pull for command mode)
- RXD-11
- TXD-10
- VCC-3.3
- GND-GND
- KEY-Not Connected
For anyone trying to use other pins for RX and TX keep in mind that SoftwareSerial relies on change interrupts so only certain pins will work. 10 and 11 work on Leonardo, Mega's, and UNO's so I've used them here.
Once you are connected copy the following Sketch into your IDE.
#include <SoftwareSerial.h>
SoftwareSerial mySerial(10, 11); // Use 10 for RX, 11 for TX
void setup() {
Serial.begin(9600); //open up Serial communication and wait for information     while (!Serial) {     }
Serial.println("Ready!");
mySerial.begin(38400); //Set the data rate for the HC-05 Configuration, when in AT mode (comment out next line)
//mySerial.begin(9600);//Use the following line when communicating Arduino-CHIP (comment out previous line)
}   void loop() // this is what facilitates the communication
{
if (mySerial.available())
Serial.write(mySerial.read());
if (Serial.available())
mySerial.write(Serial.read()); }
Now this step will seem complicated but it works for me in this order every time:
- Pull VCC from module end and Upload Code to your Arduino (having the module on will mess up your serial connection so make sure it's off.
- Hold button and connect VCC
- Release button and pull State 3.3V connection (The module should now blink slowly)
- Open Serial Monitor, Set to Both NL &CR and 9600 baud.
- Type AT and see OK returned
If ERROR is returned, wait a second and try again. If you continue to get ERROR or nothing, check your connections and repeat from Step 1. If you get OK then your HC-05 is in AT Command mode. Set the following attributes:
AT+UART=9600,1,0 AT+ROLE=0
Check that these took with the following
AT+UART? AT+ROLE?
This sets the UART communication baud, the stopbit, and parity. We then set the Role to Slave. Optionally at this point you can change the name with "AT+NAME" and check the address with "AT+ADDR?" You can find more commands like how to change the password here. I am only using one module currently so I left mine as HC-05 and will find the address with the CHIP. Your HC-05 has now been configured. Once again pull VCC and change the baud rate in the Sketch from 38400 to 9600 by uncommenting and commenting out the lines noted. Upload the new code and reattach VCC. The module should now blink quickly.
Now for the PocketCHIP side of things:Bluez is installed by default so you can fire up the hcitool and see if your HC-05 is working.
chip:~$ hcitool scan
This is nice for an easy check that the module has power but the we are not ready for Serial communication yet.
To use the interactive bluetooth command we need to install the utilities.
chip:~$ sudo apt-get install bluetooth
chip:~$ sudo apt-get install bluez-utils
Now we are going to launch the utility, power on the module and scan for devices.
chip:~$ bluetoothctl
[bluetooth]# power on
[bluetooth]# scan on
[bluetooth]# devices
At this point you should see the MAC address and HC-05. It should look like 00:00:00:00:00:00, so insert this below when we call for "YOUR MAC HERE."
Turn off the scan and turn the agent on, this allows the Bluetooth device to prompt a password. When pairing it is easiest to highlight the MAC address and use the Paste icon (use a stylus trust me) to quickly insert the MAC without typing. Once you pair it, you will be prompted for your password, the default for the HC-05 is 1234.
[bluetooth]# scan off
[bluetooth]# agent on
[bluetooth]# pair YOUR MAC HERE 1234 (The default password or whatever you set earlier)
[bluetooth]# connect YOUR MAC HERE
[bluetooth]# trust YOUR MAC HERE
[bluetooth]# quit
Now you are connected. We need to bind that MAC address with a communication port. Then we can start listening to that channel and writing to it.
chip:~$ sudo rfcomm bind 0 YOUR MAC HERE
chip:~$ sdptool add sp
chip:~$ rfcomm listen YOUR MAC HERE 1
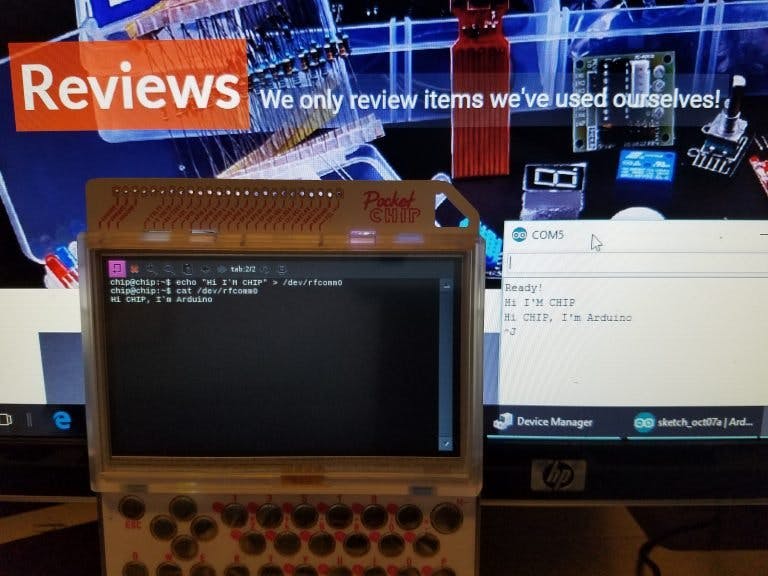
chip:~$ echo "Hi Arduino, I'm CHIP" > /dev/rfcomm0
You can Create a new tab here to switch back and forth between talking and receiving on PocketCHIP. The serial monitor will show all communication regardless of which side initiated it. Echo writes information and Cat reads it. You can also hang up with CTRL-C if you want to keep everything on one screen.
chip:~$ cat /dev/rfcomm0
Now write from the Arduino.
These instructions should work with any Debian based Linux SoC (Like RPi )with Bluetooth capabilities or a Bluetooth dongle. For more info on the bluetoothctl utility see here.
In part 3 we will look at using Wifi to connect the PocketCHIP to the Arduino.


Comments