


Hardware components | ||||||
| × | 20 | ||||
| × | 1 | ||||
| × | 1 | ||||
| × | 1 | ||||
| × | 1 | ||||
| × | 1 | ||||
Hand tools and fabrication machines | ||||||
 |
| |||||
| ||||||
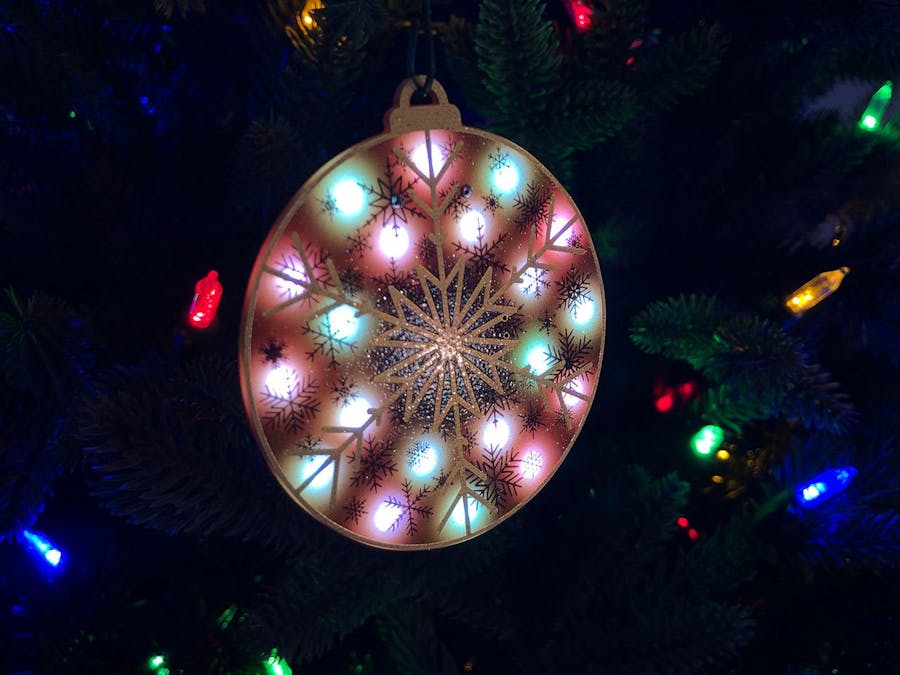
For the last 3 Holiday Seasons I have produced an ornament of some kind to raise money for the Child's Play Charity. In the last 2 seasons I created PCB Ornaments for this purpose. The first year was a board only design that was exclusive to a Secret Santa event I was running. This past season I decided to expand the market to the public and create a blinky ornament that would provide a couple of new artistic and technical challenges for myself.
New Personal ChallengesThis Holiday Season Ornaments are always special projects to me and as such I try to make them special for whoever acquires them. I also try to push myself a little bit more and more with each big project. Here were my personal challenges and this time:
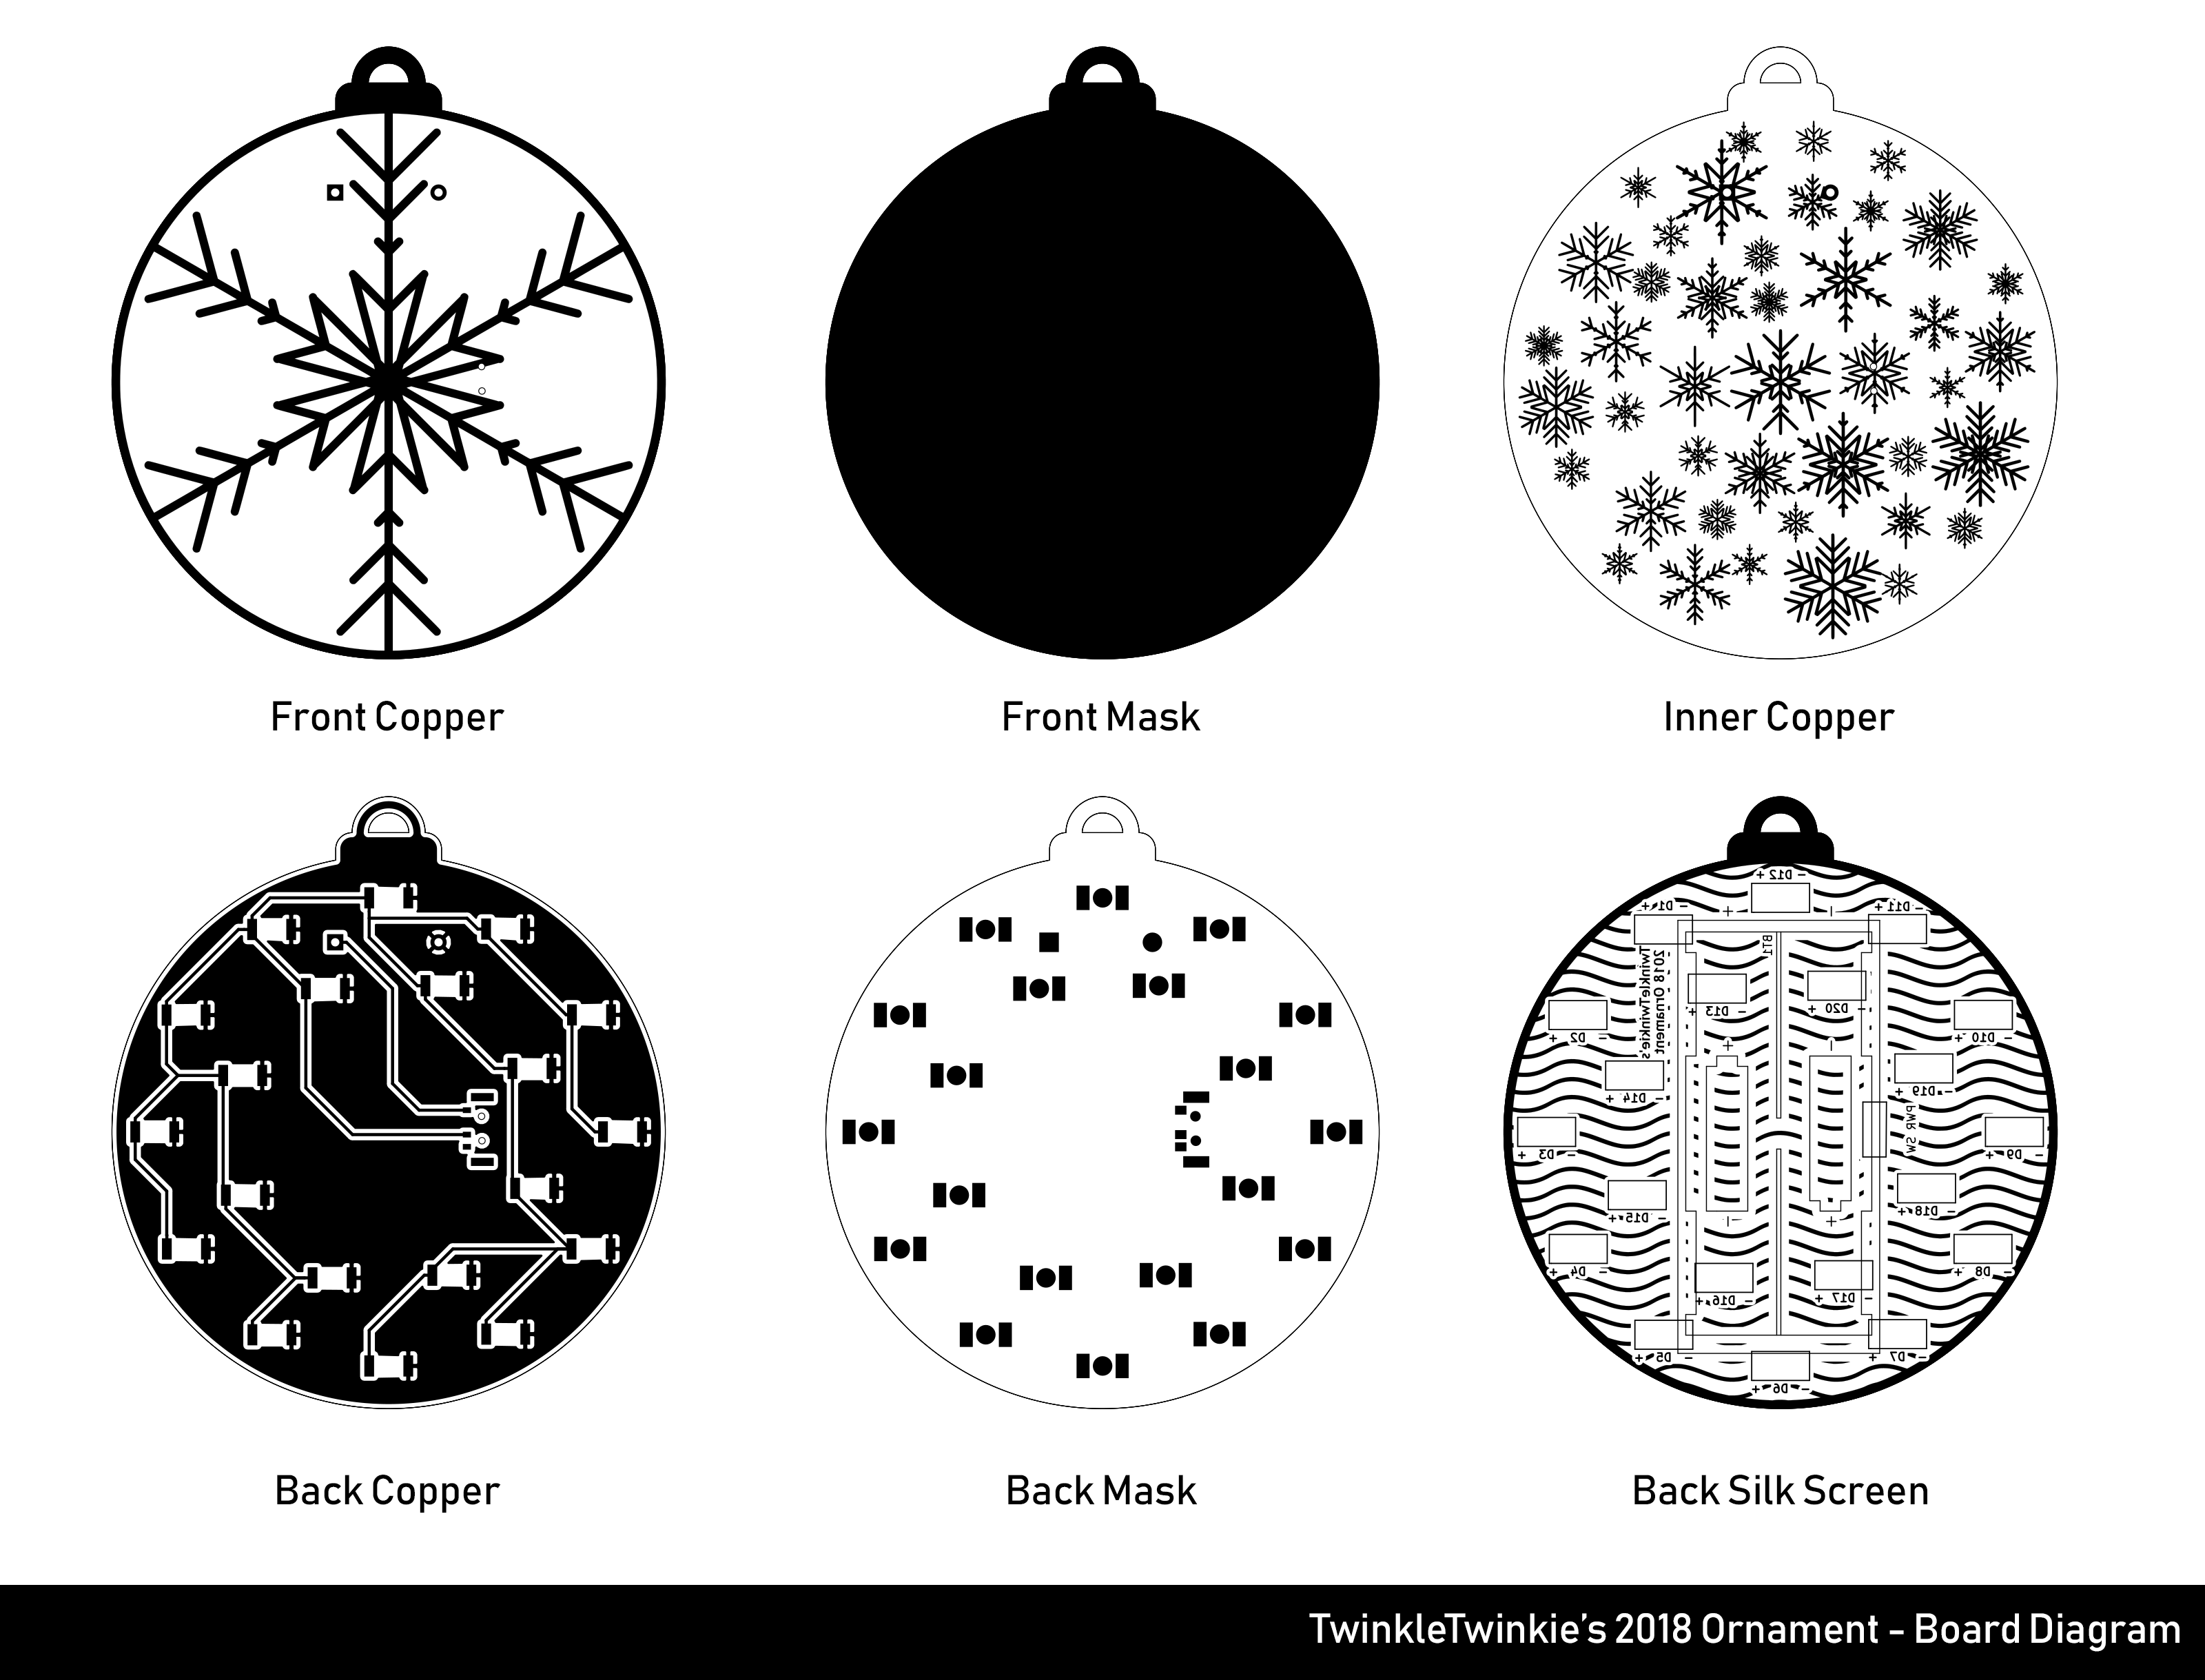
4 Layer Design
When I create a Printed Circuit Board I always come at it from the "Art First" perspective and as such I haven't yet needed to use more than two layers. With this project I knew I was going for a "snow globe" feel and so I wanted there to be background elements that you could see but not actually touch like the inside of a snow globe.
To achieve this effect I turned to inner copper layers. The idea being that the light shining through the board would back light the smaller internal snow flakes bringing them into sharper contrast but unlike normal top layers you wouldn't be able to feel it if you tried to touch it.
Lots of LEDs
On prior projects the most LEDs I had used was 8 on my "Mad Cat" Cheshire Cat Add-on. My greatest limiting factor for LED count isn't actually board space or cost, it's time to assemble it. To get the effect I wanted with the least amount of hardware I used 20 2 Pin Random Flashing RGB 0805 LEDs. These LEDs are typically mounted so that the light they produce shines up but I needed them to shine down through the board. To do this I manually soldered all 20 LEDs upside down. This is not a Pick and Place friendly process and so it is not Reflow oven friendly either so it has to be done by hand.
Glitter Post Processing
On my Halloween "Pumpkin Witch" badge I experimented with a little bit of post processing on the PCB. In that case I used an OSP Copper Finish to get the beautiful shade of orange it provides but OSP Copper tarnishes very easily if handled by people. To prevent that from being a problem I applied a matte clear coat to the boards. The success of that experiment encouraged me to continue experimenting with PCB Post processing by applying spray glitter to the ornaments.I did this for two reasons:
1. To provide more "power off" appeal to the ornament.
2. To see if I could really make a glitter coat that didn't rub off from handling.
I think I achieved both goals. I applied a modest amount of "Glitter Blast" from Krylon, only 1 coat and then followed that up with 2 coats of "Glitter Clear Coat". Regular clear coat works just as well as I turned to that after using up the first can of the Glitter Specific Clear Coat.
This gave me a glittery sheen that worked well with the glowing LEDs and it looked great on a tree when powered off and best of all it didn't fucking get glitter everywhere!
Creating Kits with Instructions
Okay so kits aren't really that big a deal...except they're very time consuming to assemble and I was soldering the LEDs in an unconventional fashion and I was trusting that any brave soul that bought the kit would be able to replicate my technique.
To reduce the potential amount of customer service I would have to deal with post sale I decided to limit the number of kits to 10. To be honest I only decided to do kits because of feedback I got on prior projects. I love purchasing and assembling kits myself but I've worked with people long enough to know that sometimes they can get in over their heads and sometimes they like to make that your problem.
Thankfully this community has some of the best customers anyone can ask for and everything went off without a hitch. I created the best detailed instructions I could and put them on the Hackaday.io page for the project. I haven't heard from everyone who bought a kit but the ones I did hear from were very happy with what they received and the instructions I provided.
Here are some technical details about the ornament's PCB.
- Dimensions: 68x75x1.6mm
- Silk Screen: White
- Solder Mask: Red
- Copper Layers: 4 (Only Used 3)
- Board Material: FR4
- Copper Finish: ENIG (Gold)
- 20x 0805 Slow Flashing RGB LEDs
Special Edition
OSHPark generously donated a run of 3 boards as well, these became the "Special Edition" Boards. OSHPark's fab uses a much lighter colored Fiberglass material on their 4 layer boards giving the exposed FR4 a milky white color. I used "Slow" random RGB LEDs for the regular ornaments so for the special edition I used "Fast" Random RGB LEDs instead.
Special Edition Technical Details:
- Silk Screen: White
- Solder Mask: Dark Purple
- Board Material: "White" FR4
- 20x 0805 Fast Flashing RGB LEDs
I launched my 2018 Ornament at the end of November and before December 2nd I had completely sold out of all of my Ornaments including the 3 Special Edition Ornaments. In total $1, 000 USD was donated to the Child's Play Charity.
This was a big success and I full intend to continue this practice for a 4th year in 2019.
The Numbers:- PCBs Produced: 50 + 3 Special Edition
- Number of Kits Sold: 10
- Number of Ornaments Sold: 33
- Cans of Glitter Used: 3
- Cans of Clear Coat Used: 2
- Number of LEDs Hand Soldered: 860

Comments