


Hardware components | ||||||
 |
| × | 1 | |||
| × | 1 | ||||
| × | 1 | ||||
 |
| × | 1 | |||
| × | 2 | ||||
 |
| × | 1 | |||
| × | 1 | ||||
| × | 1 | ||||
 |
| × | 1 | |||
 |
| × | 1 | |||
| × | 2 | ||||
 |
| × | 1 | |||
 |
| × | 1 | |||
 |
| × | 4 | |||
 |
| × | 1 | |||
Software apps and online services | ||||||
| ||||||
 |
| |||||
| ||||||
For the last 3 years, my mother has been losing her short range memory. She was diagnosed with Alzheimer disease. This makes she forget where she put some stuff like house keys, id documents, wallet, money, etc. She suffers a lot, and blame all people around. So, if could be a way to help her to locate her most important objects, it would be GREAT.
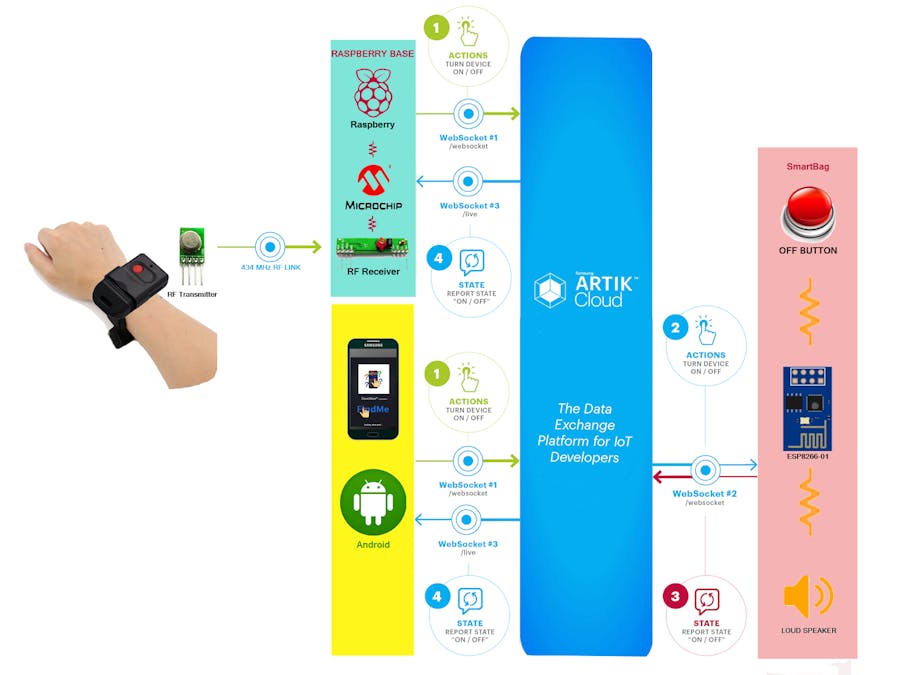
Therefore, I designed a device will be attached to a bag containing that objects she care the most (we called this new bag as SmartBag), so the bag can be called by actions from Artik Cloud through an Raspberry Pi B+ based BASE, which listen locally a RF signal from a wearable button (myRFButton)"call" her indicating its location using a wearable simple button, which sends an alert by low power RF; and also messages from an Android app called "FindMe"
A patient with alzheimer, will be able to "call" the SmartBag pushing a wearable button, myRFButton, and send a RF signal to the "Base". This, will send a message to the Artik Cloud and activate the SmartBag by a rule which sends an action to this last. Once the SmartBag is activated, it starts to emit a very loud sound and stop that noise until the SmartBag is deactivated pushing its "stop button" on it. I hope the app for Android phone can be finished at time, with that app, can either ON of OFF the SmartBag too.
First of all, we need to configure the Artik Cloud. We need to create an Application: "FindMe System", two Device Type: "SmartBag" "myRFButton", and two devices: "MySmartBag" and "myMomRFButton".
Using the Artik Cloud dashboard, we are going to create a new application called "FindMe System, and a device type called "SmartBag" with the field STATE of type Boolean (false or true) and two standard actions: setOn and setOff as shown in figure bellow:
Once you had created the application and the device type, don't forget to grant for your device type the correspondent permission
Now, you can define a device of the type SmartBag and myRFButton into Artik Cloud
At this point, we need to create THREE Artik Cloud "Rules" : one, when the myMomRFButton STATE changes to true, it makes the mySmartBag starts to sound louder and an email is sent to me; two, when the mySmartBag STATE changes to true, to respond to Android app which sends actions and waits for STATE to report status, also, an email is sent; and finally, three, when the mySmartBag STATE changes to false, then cloud will send an email telling us everything is ok, the mySmartBag device is BACK. These rules are shown bellow:
Now, we're ready to connect our devices, apps, and software to our cloud to help people/patients to find their important objects.
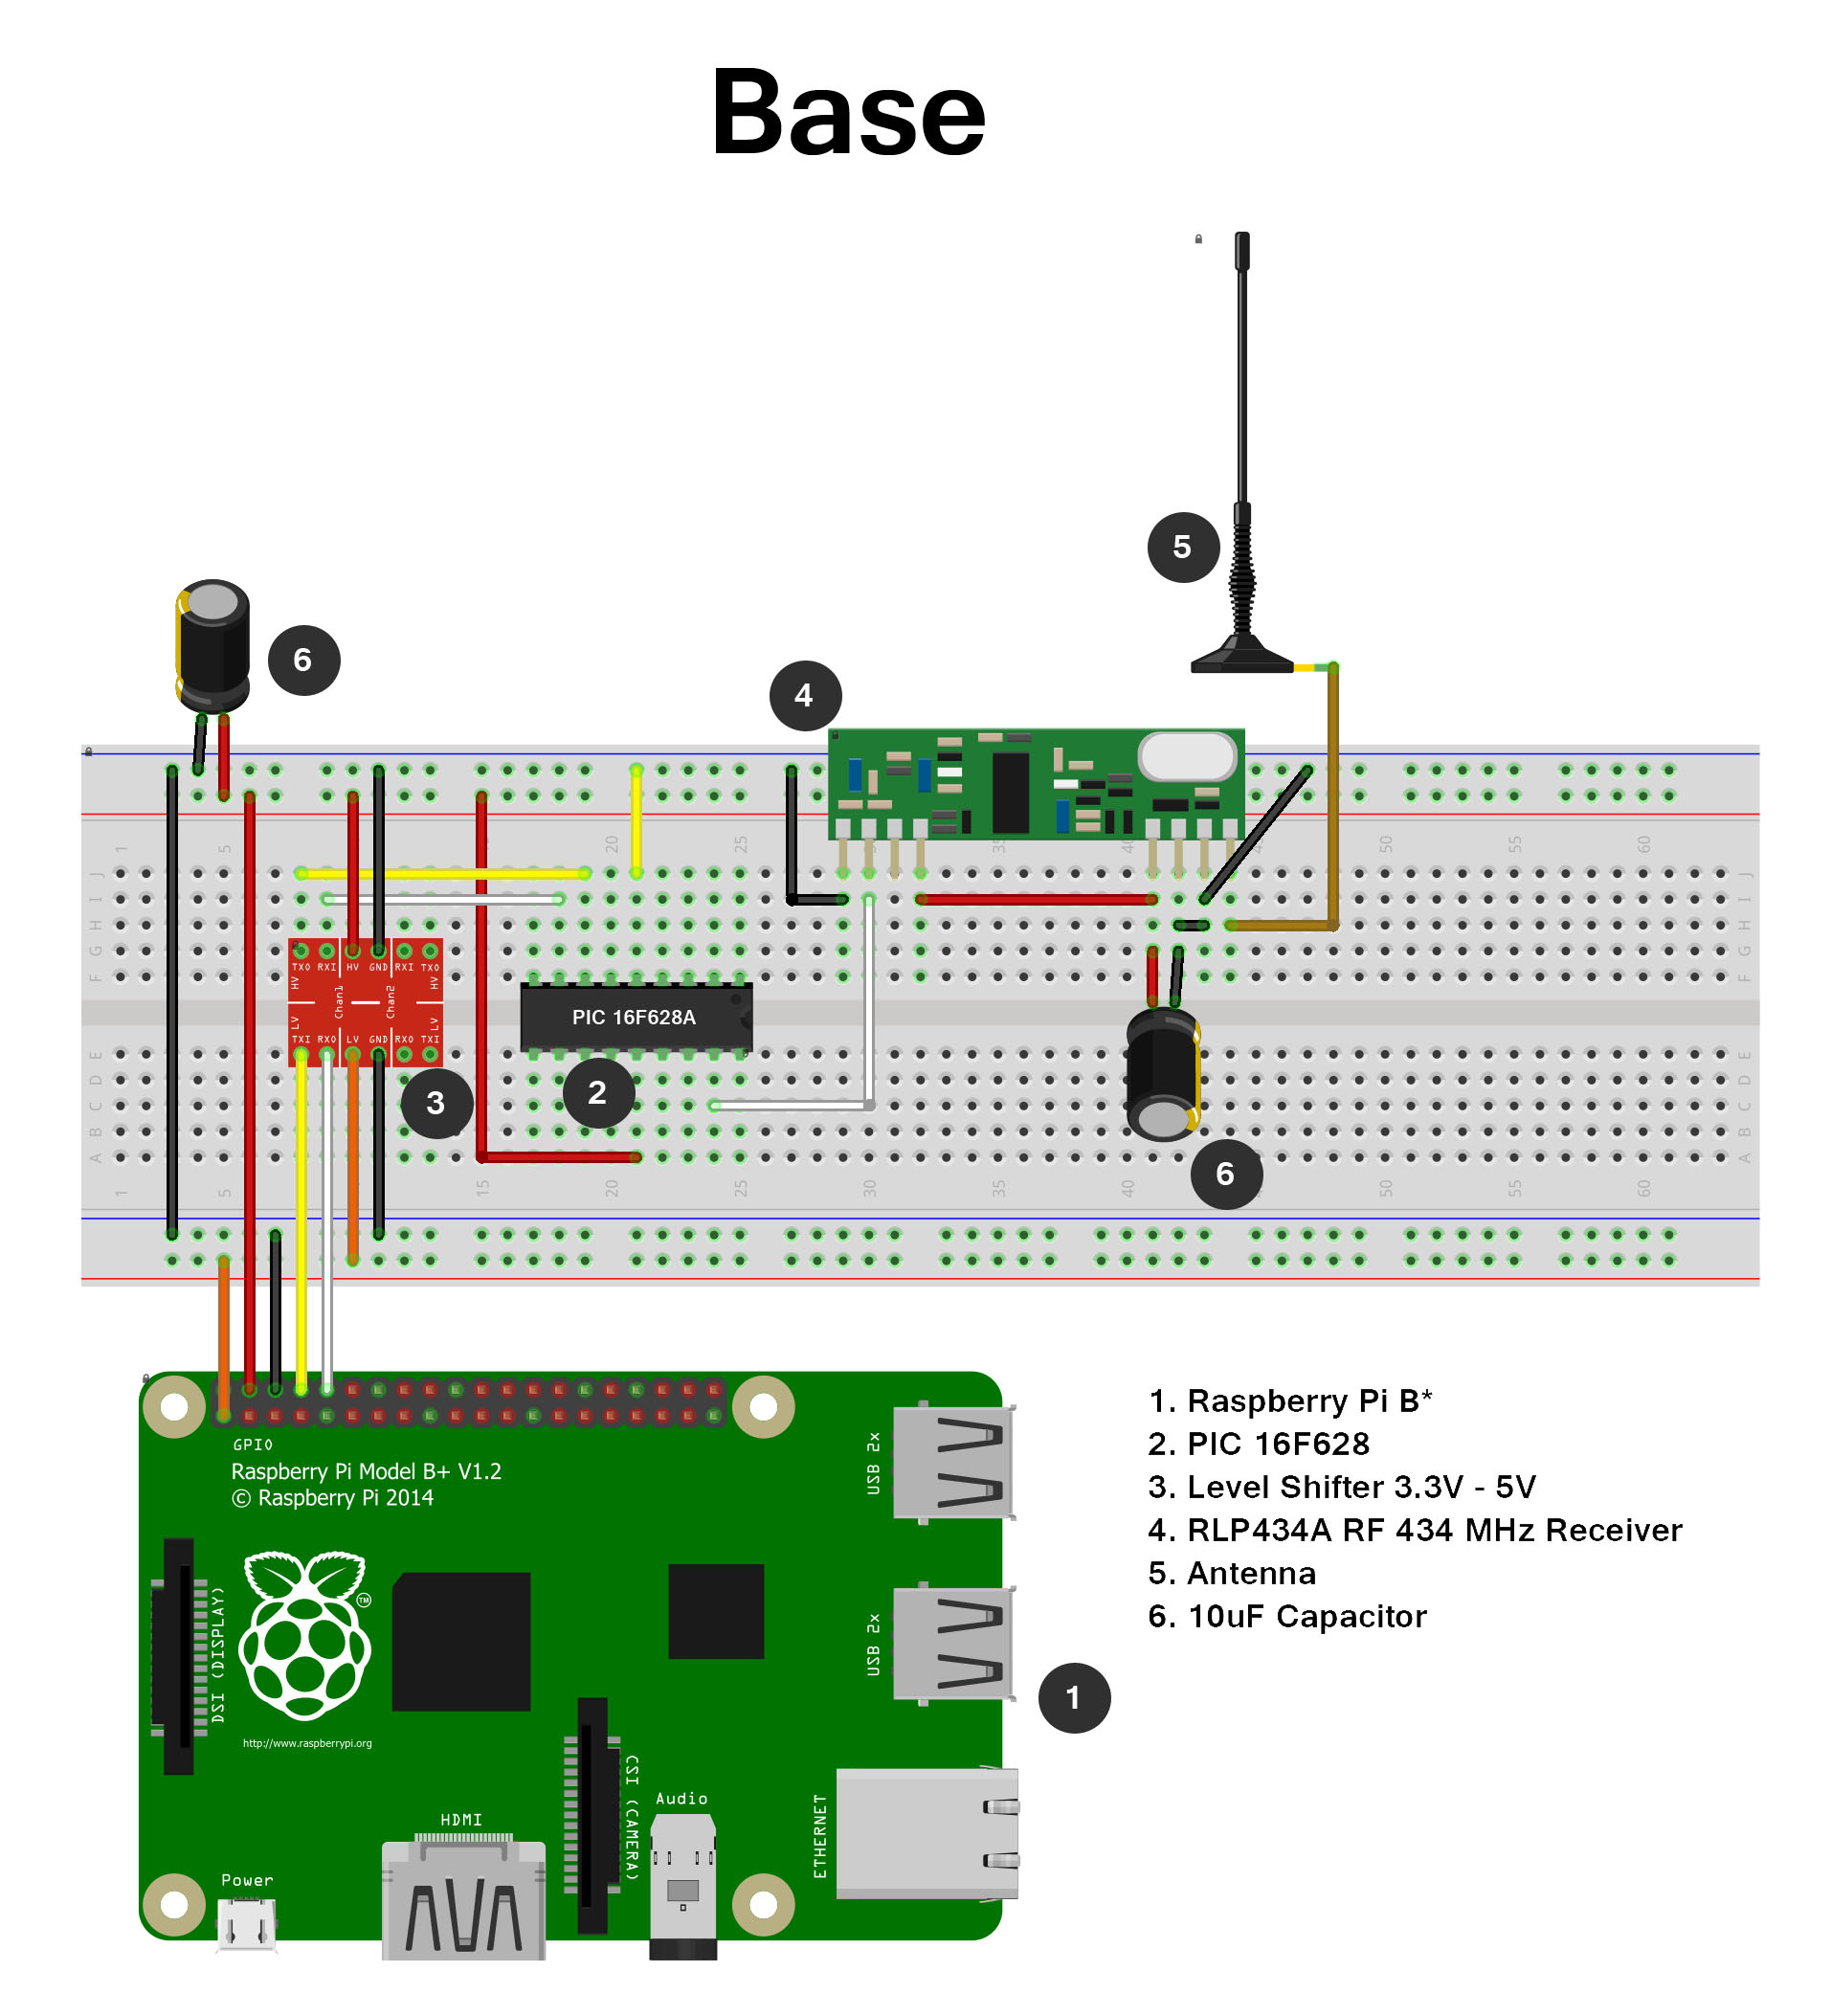
The first stage, is connect the PIC16F628A controlling the RF receiver, with the Raspberry Pi B+ by UART. The first, it's a 5V microcontroller, so we need an interface 3.3V to 5V to achieve this goal.
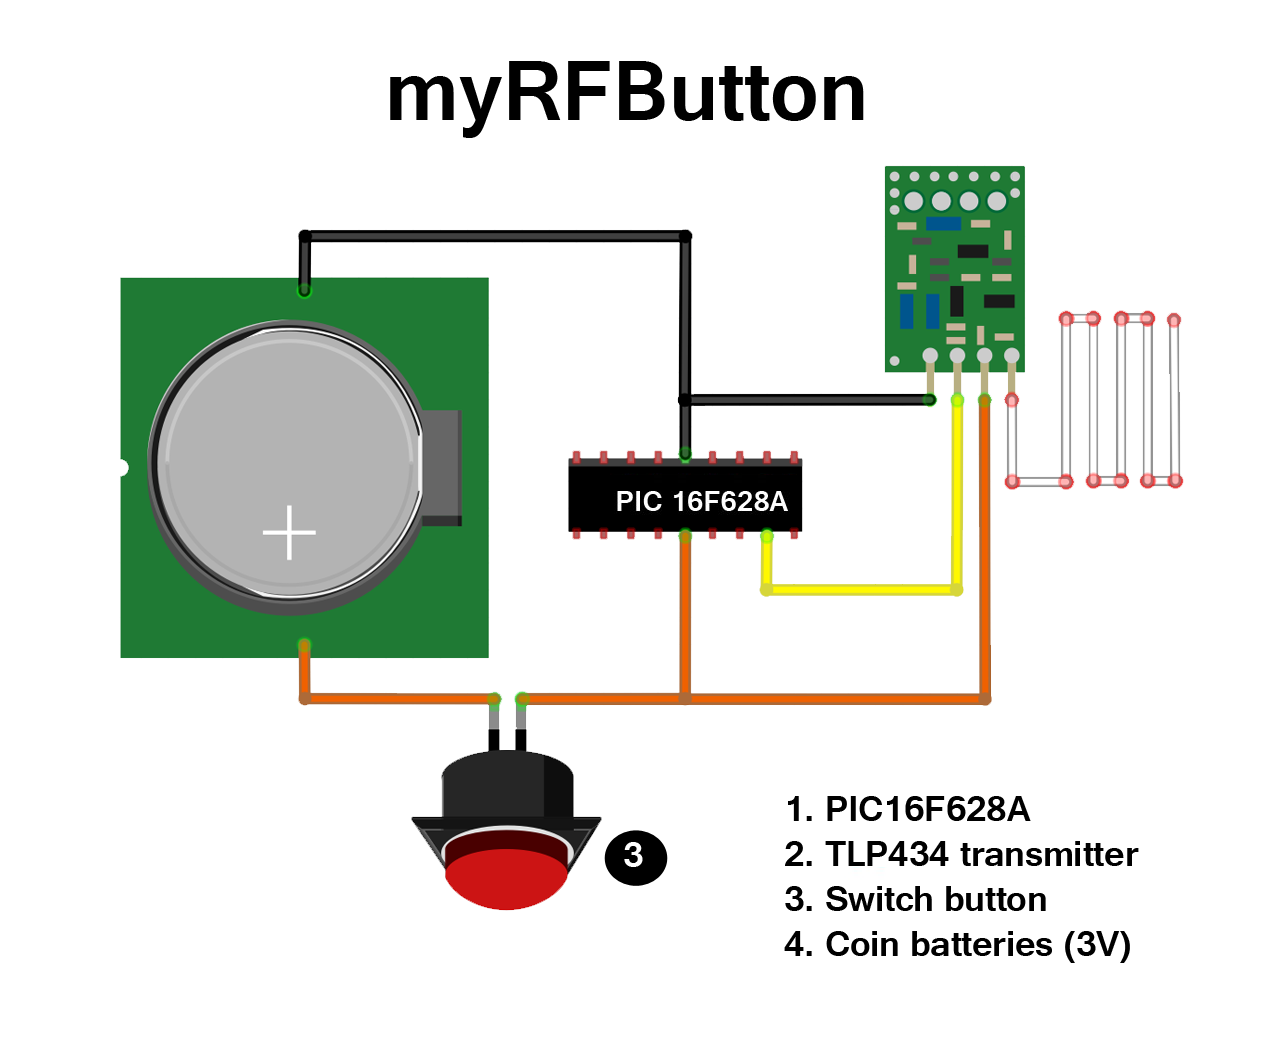
The system needs two of this microcontrollers: one in myRFButton, and one in Base. They communicates each other by a 434MHz low power wireless link (around 10mW). This link, reach 50 to 80 meters indoor, good enough for any house/building/piece in any place in the world. I choose this wireless link, because is very cheap, battery only dry out when the button is pressed, and no interfere with any other signal. The android phone by the other hand, is optional, because it can be hidden by the patient as well the bag itself; the myRFButton, I hope no.
We're going to use the UART of the raspberry Pi to receive a message from the PIC16F628A sniffing the myRFButton signal. So, as is shown bellow, we need to connect through a level shifter (bellow) to the pins UART TX (pin 8), UART RX(pin 10) with the PIC UART TX (pin 8), UART RX(pin 7)
Our very cheap RF Link, only dries the coin batteries set (two) ONLY when the button is pressed; that's why I selected this way to alert the base. As a wearable device, the myRFButton must save energy. The base is attached to an AC Power adapter 5V 2A.
DemoNow, test our RF Link indoor:
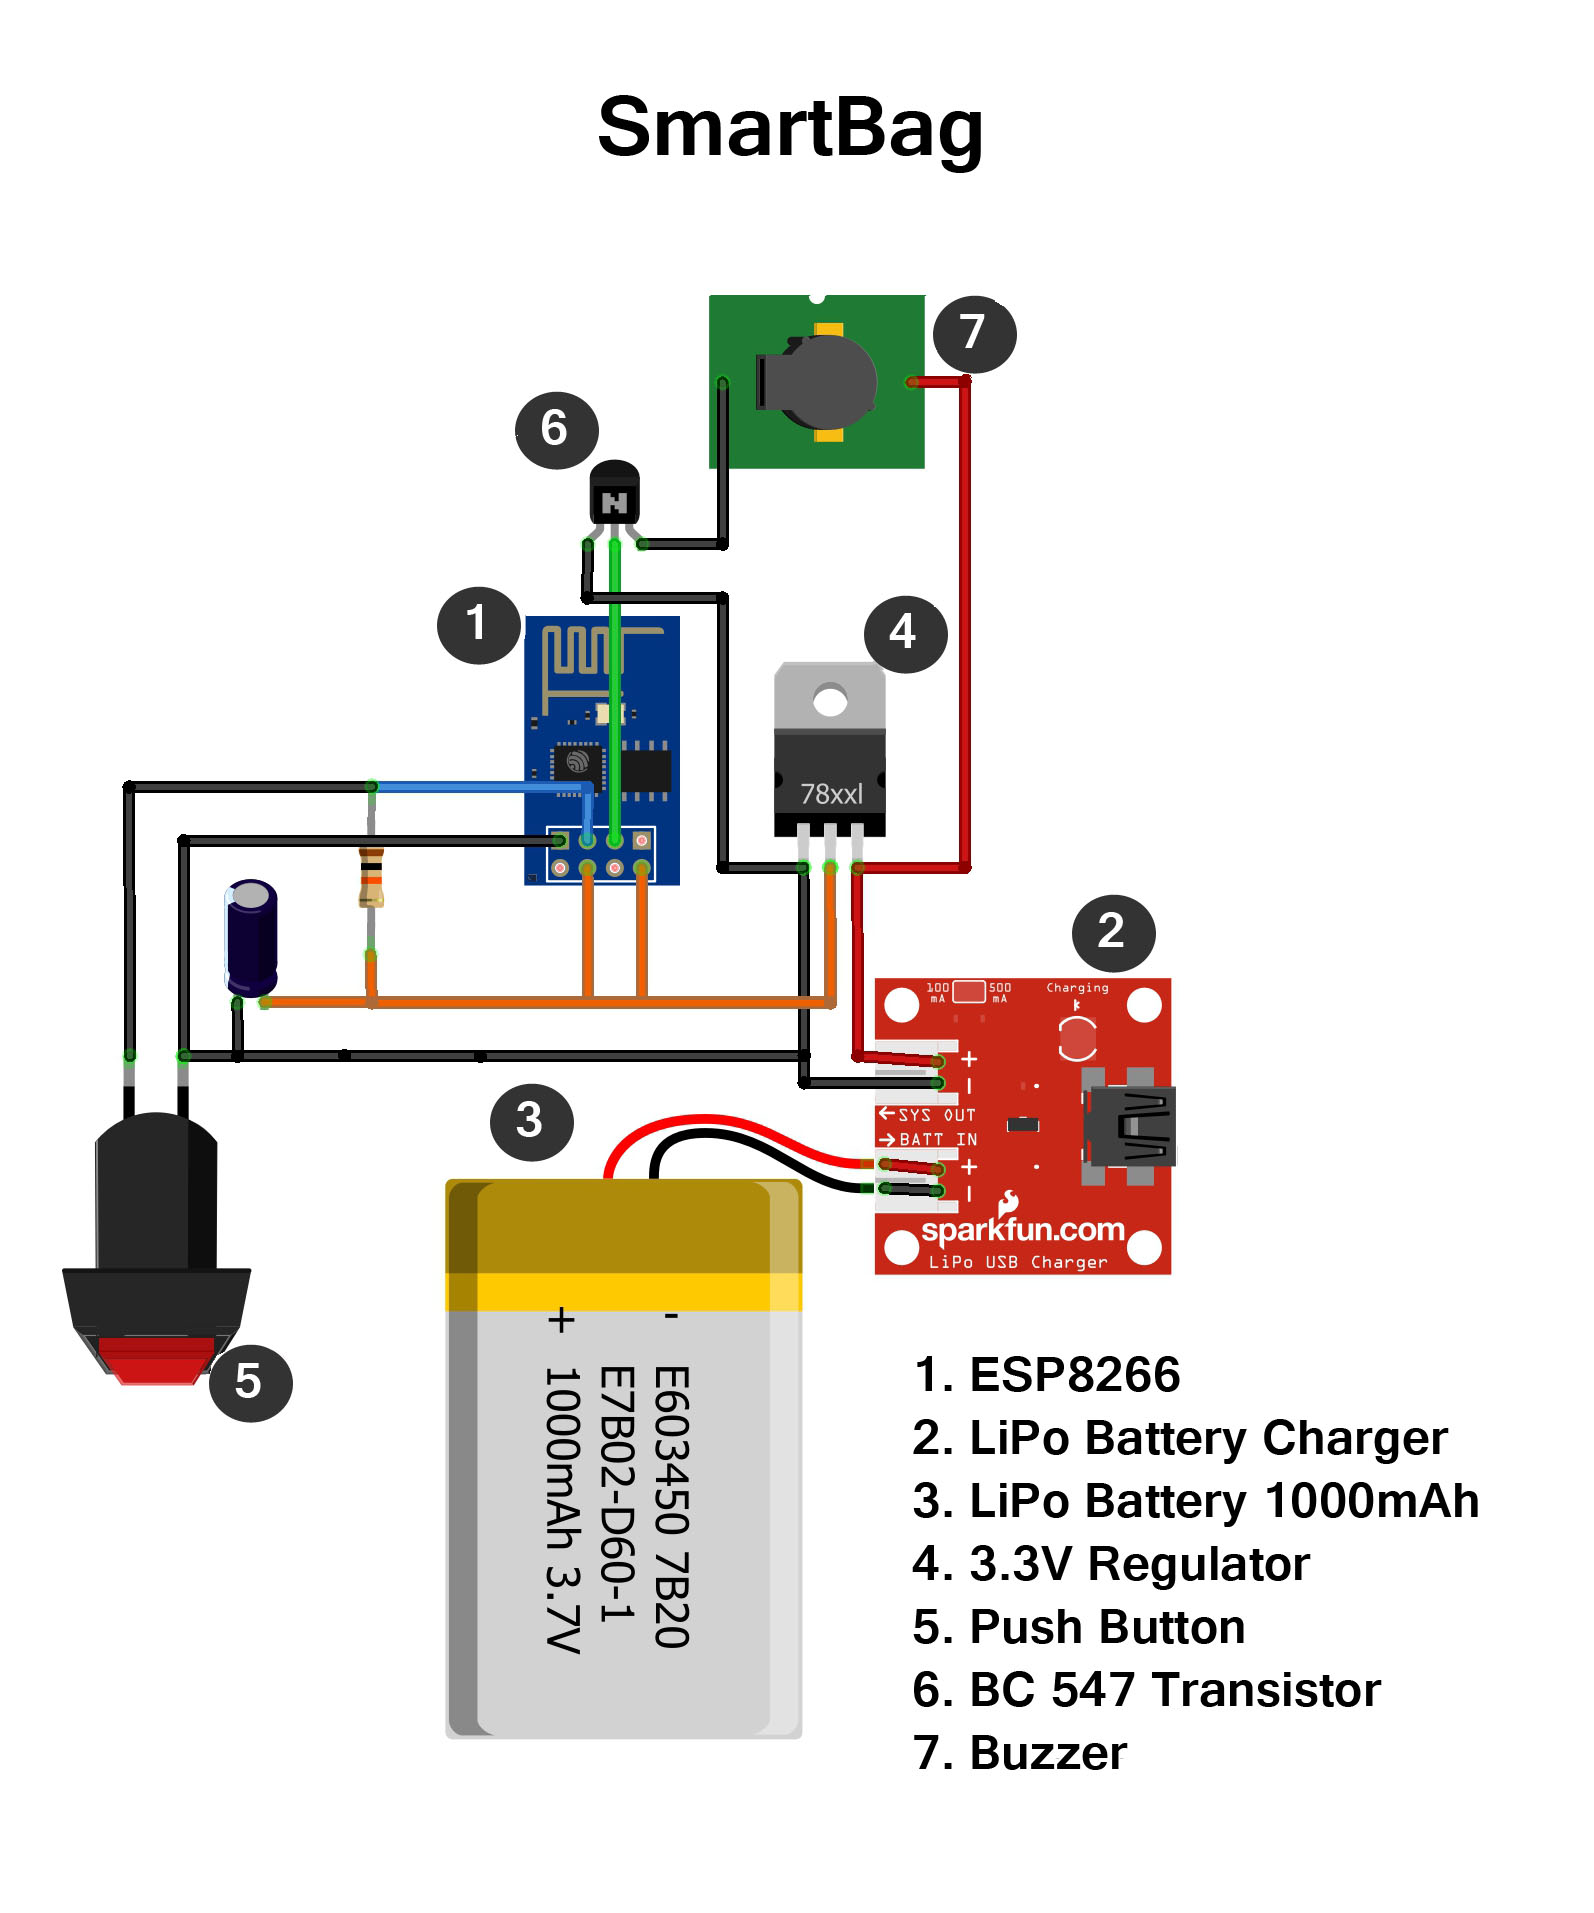
SmartBagNow, the SmartBag. This device is within the bag, purse, or other container carry by the alzheimer patient. Its powered by two LiPo batteries of 3.7 V each, to power the loud buzzer and the ESP8266-01 module. To this power module, I made a modification to get one more GPIO for activate the sound, as shown in figure bellow:
This mode was necessary because the other GPIO, GPIO0 and GPIO2 must be in HIGH at the boot to operates in normal mode.
For compile the code, I used the Arduino IDE with the ESP8266 Arduino core. In this links describes DETAILED the way to get that core installed. Then, I choose the Generic Module as board, and finally, compiled the code. To flash the .bin file generated, I searched it into a temporary folder indicated in the compiling detailed output, easy configured in preferences menu. To flash the Smartbag.ino.bin, I used the ESP FLASH DOWNLOAD TOOL v2.3, putting first GPIO0 to GND, then the RST to GND for moment, then leave NC.
Finally, the Android App, based on the IoT Remote Control Example :
The End!
FindMe Base
SmartBag IoT Device


_3u05Tpwasz.png?auto=compress%2Cformat&w=40&h=40&fit=fillmax&bg=fff&dpr=2)
Comments