

_0oE9kS1W7E.png?auto=compress%2Cformat&w=40&h=40&fit=min&dpr=2)
Hardware components | ||||||
 |
| × | 1 | |||
| × | 1 | ||||
| × | 1 | ||||
| × | 1 | ||||
| × | 1 | ||||
| × | 1 | ||||
| × | 1 | ||||
| × | 1 | ||||
| × | 1 | ||||
| × | 1 | ||||
| × | 1 | ||||
 |
| × | 1 | |||
| × | 1 | ||||
| × | 1 | ||||
Software apps and online services | ||||||
| ||||||
| ||||||
Hand tools and fabrication machines | ||||||
| ||||||
| ||||||
 |
| |||||
I’ve seen quite a few cool projects with Gameboy and Raspberry Pi, such as: this, this and this.
These are really fantastic projects and inspired me to make an attempt at my own Gameboy Color Raspberry Pi – and then attempt a full game of Player Unknowns Battlegrounds on it.
Be aware, I am still fairly amateur to working with cutting plastics and assembling things. And during this build I realised I need some better cutting tools and stuff, so please don’t judge me too harshly for the poor build quality.
- General stuffs, bit of blue tak, tools and some tie-wraps, heatsinks.
- PC with NVIDIA Graphics and Battlegrounds
So at first, my plan was to keep the battery compartment and use 2xAA batteries and voltage boost them up to 5v for the Pi to use, but it seems with a screen etc. attached this caused issues and the screen flickered, so I opted to go for a LiPoly with a PowerBoost 500c.
So I began planning where I would put the Pi, screen etc. by using an old shell I didn’t care about, before cutting up my nice red one:
And so the snipping and fitting began:
I basically had to remove tons of plastic from this to get it all to fit in in the end, the rings around the buttons went, the bottom bits of plastic, the screen, parts of the battery compartment, it was a massacre of ABS plastic. The usual setup for the PowerBoost 500c can be found in my Wrist Watch project. Solder in headers into the Pi and the Pi TFT and then hook them together (with optional heatsink on the Pi beforehand). I got a bit of veroboard for all the buttons to go to GND:
Then wired them all in, as well as the GND from the I2S DAC, with the other end of the buttons going to the following pins:
- 27 – Down
- 22 – A
- 23 – B
- 24 – Right
- 17 – Left
- 5 – Start
- 6 – Up
- 12 – Select
Then connect the veroboard to GND, these should all be available on the Pi TFT breakout.
Wire up the rest of the I2S DAC as per instructions over at Adafruit, for power in on this project I wired VCC to 3v on the Pi as the metal speaker probably won’t like much more going through it.
Ready for some button testing, I built up a Raspbian image using PiBakery:
To map the GPIO buttons to inputs I opted for Python input. Then I loaded up the Python code (also found under the code section in better format):
import RPi.GPIO as GPIO import time import uinput  GPIO.setmode(GPIO.BCM)  GPIO.setup(27, GPIO.IN,
pull_up_down=GPIO.PUD_UP) GPIO.setup(22, GPIO.IN, pull_up_down=GPIO.PUD_UP) GPIO.setup(23, GPIO.IN, pull_up_down=GPIO.PUD_UP) GPIO.setup(24, GPIO.IN, pull_up_down=GPIO.PUD_UP) GPIO.setup(17, GPIO.IN, pull_up_down=GPIO.PUD_UP) GPIO.setup(5, GPIO.IN, pull_up_down=GPIO.PUD_UP) GPIO.setup(6, GPIO.IN, pull_up_down=GPIO.PUD_UP) GPIO.setup(12, GPIO.IN, pull_up_down=GPIO.PUD_UP)  device = uinput.Device([ uinput.BTN_LEFT, uinput.BTN_RIGHT, uinput.REL_X, uinput.REL_Y, ])  try: while True: input_down = GPIO.input(27) input_a = GPIO.input(22) input_b = GPIO.input(23) input_right = GPIO.input(24) input_left = GPIO.input(17) input_start = GPIO.input(5) input_up = GPIO.input(6) input_select = GPIO.input(12)  if input_up == False: print(‘Up Button Pressed’) device.emit(uinput.REL_Y, -5) time.sleep(0.2)  if input_down == False: print(‘Down Button Pressed’) device.emit(uinput.REL_Y, 5) time.sleep(0.2)  if input_left == False: print(‘Left Button Pressed’) device.emit(uinput.REL_X, -5) time.sleep(0.2)  if input_right == False: print(‘Right Button Pressed’) device.emit(uinput.REL_X, 5) time.sleep(0.2)  if input_start == False: print(‘Start Button Pressed’) time.sleep(0.2)  if input_select == False: print(‘Select Button Pressed’) time.sleep(0.2)  if input_a == False: print(‘A Button Pressed’) device.emit_click(uinput.BTN_RIGHT) time.sleep(0.2)  if input_b == False: print(‘B Button Pressed’)
The guide above for the I2S DAC will also guide through installing and testing the speaker, once that was confirmed working I got to some further testing and placement within the GBC case:
Once I’d cut up enough plastic to melt down and make a statue of myself I was happy with the placement of buttons and circuits – the powerboost is at the bottom right, the DAC bottom left and the metal speaker above the Powerboost; where the original speaker would have been on the original GBC – with some tape on the back to stop it shorting anything.
Also I had to snip up the start/select buttons and the D-Pad to get it to fit (warning: not pretty):
Before properly assembling it all I followed the instructions over at Adafruit for installing the Pi TFT 2.2 and then made a Python script for mouse controls; with the D-Pad moving the mouse around and the A/B keys working the mouse buttons and finally Start and Select for W/S respectively.
In order to get accelerate video through to the Pi TFT, you need to use fbcp. Follow the instructions here. Under X server, Console and Framebuffer mirroring, the only change I found I needed to make was the ‘/usr/share/X11/xorg.conf.d/99-fbdev.conf’ file:
Section "Device" Identifier "myfb" Driver "fbdev" Option "fbdev" "/dev/fb0" EndSection
This makes it write the X server to fb0 which is then copied to fb1 by fbcp, which is then written to the TFT (I think, I could be technically wrong here, but it works for me). In your /etc/rc.local file, put the below in above exit:
fbcp &
This will launch fbcp on boot the & ensures that it will run in the background.
There is also some further adjustments needed in ‘/boot/config.txt’, make sure the file is set to the below:
# For more options and information see
# http://rpf.io/configtxt # Some settings may impact device functionality. See link above for details  # uncomment if you get no picture on HDMI for a default “safe” mode #hdmi_safe=1  # uncomment this if your display has a black border of unused pixels visible # and your display can output without overscan disable_overscan=1  # uncomment the following to adjust overscan. Use positive numbers if console # goes off screen, and negative if there is too much border #overscan_left=16 #overscan_right=16 #overscan_top=16 #overscan_bottom=16  # uncomment to force a console size. By default it will be display’s size minus # overscan. framebuffer_width=320 framebuffer_height=240  # uncomment if hdmi display is not detected and composite is being output hdmi_force_hotplug=1  # uncomment to force a specific HDMI mode (this will force VGA) hdmi_group=2 hdmi_mode=87 hdmi_cvt=320 240 60 1 0 0 0  # uncomment to force a HDMI mode rather than DVI. This can make audio work in # DMT (computer monitor) modes #hdmi_drive=2  # uncomment to increase signal to HDMI, if you have interference, blanking, or # no display #config_hdmi_boost=4  # uncomment for composite PAL #sdtv_mode=2  #uncomment to overclock the arm. 700 MHz is the default. #arm_freq=800  # Uncomment some or all of these to enable the optional hardware interfaces dtparam=i2c_arm=on #dtparam=i2s=on #dtparam=spi=on  # Uncomment this to enable the lirc-rpi module #dtoverlay=lirc-rpi  # Additional overlays and parameters are documented /boot/overlays/README  # Enable audio (loads snd_bcm2835) #dtparam=audio=on dtoverlay=hifiberry-dac dtoverlay=i2s-mmap  # — added by adafruit-pitft-helper Mon 11 Sep 07:15:48 UTC 2017 — [pi1] device_tree=bcm2708-rpi-b-plus.dtb [pi2] device_tree=bcm2709-rpi-2-b.dtb [all] dtparam=spi=on dtparam=i2c1=on dtparam=i2c_arm=on dtoverlay=pitft22,rotate=90,speed=32000000,fps=60 # — end adafruit-pitft-helper Mon 11 Sep 07:15:48 UTC 2017 —
This will ensure that everything will run at the resolution of the Pi TFT, from here you can reboot and everything should now switch over to the TFT, making working on it interesting at this point because the VNC connection will be tiny, probably best to work from command line from here on in when possible.
There are, of course, more logical things to do at this point, such as installing RetroPie and Adafruits Retrogame to make a little emulation station, but I can’t help doing something ridiculous.
Here’s the code for my buttons (WordPress has messed with the formatting it seems), this is optimal for PUBG as Equals and F key will be used for autorun and interact respectively. I have another code with W/S configured instead for other games:
import RPi.GPIO as GPIOimport RPi.GPIO as GPIOimport timeimport uinput GPIO.setmode(GPIO.BCM) GPIO.setup(27, GPIO.IN,
pull_up_down=GPIO.PUD_UP)GPIO.setup(22, GPIO.IN, pull_up_down=GPIO.PUD_UP)GPIO.setup(23, GPIO.IN, pull_up_down=GPIO.PUD_UP)GPIO.setup(24, GPIO.IN, pull_up_down=GPIO.PUD_UP)GPIO.setup(17, GPIO.IN, pull_up_down=GPIO.PUD_UP)GPIO.setup(5, GPIO.IN, pull_up_down=GPIO.PUD_UP)GPIO.setup(6, GPIO.IN, pull_up_down=GPIO.PUD_UP)GPIO.setup(12, GPIO.IN, pull_up_down=GPIO.PUD_UP)  device = uinput.Device([        uinput.BTN_LEFT,        uinput.BTN_RIGHT,        uinput.REL_X,        uinput.REL_Y, uinput.KEY_W, uinput.KEY_S, uinput.KEY_EQUAL, uinput.KEY_F,        ]) try: while True: input_down = GPIO.input(27) input_a = GPIO.input(22) input_b = GPIO.input(23) input_right = GPIO.input(24) input_left = GPIO.input(17) input_start = GPIO.input(5) input_up = GPIO.input(6) input_select = GPIO.input(12) if input_up == False: device.emit(uinput.REL_Y, -60) time.sleep(0.1) if input_down == False: device.emit(uinput.REL_Y, 60) time.sleep(0.1) if input_left == False: device.emit(uinput.REL_X, -60) time.sleep(0.1) if input_right == False: device.emit(uinput.REL_X, 60) time.sleep(0.1) if input_start == False: device.emit_click(uinput.KEY_EQUAL) time.sleep(0.2) if input_select == False: device.emit_click(uinput.KEY_F) time.sleep(0.2) if input_a == False: device.emit_click(uinput.BTN_RIGHT) time.sleep(0.2) if input_b == False: device.emit_click(uinput.BTN_LEFT) time.sleep(0.2) finally:      GPIO.cleanup()
To get this to run at the right time to interact with the Pixel GUI I found I had to launch this using a cron command, so type in:
crontab -e
Select your editor of choice and with the python script above in your home directory named as ‘gui_buttons.py’ we can run it easily by putting this new line into cron:
@reboot sudo python /home/pi/gui_buttons.py &
At this point I replicated the cutting procedure onto my red GBC shell, this is the point where I realized I needed some better cutting tools other than snips and stuff, I have a Dremel but I need a better cutting head for it.
The new GBC shell takes some assembly with the screen cover itself, but this is fairly easy to figure out.
I put the on/off switch for the Powerboost up where the switch was on the GBC and then when I was happy I tie-wrapped the thing and tested the buttons. Once fully satisfied it was going to work properly, I cut a hole for where the SD Card can be inserted/removed and then Sugru’d it all up and reapplied the tie-wraps to hold it together while it set.
The shell I bought also had some stickers and things, these can be applied as needed/wanted.
The way the Pi is facing the ports are all facing up through where the game carts would go in the original GBC; so for maintenance assistance I wanted to put a Bluetooth connector for a small KB in so that it can be connected in and still look relatively authentic, so I cut up an empty cart shell and Sugru’d the nano USB in, with a USB to Micro USB connector inside.
Bit messy, but looks better when plugged in:
With it all together and working I can boot up and navigate about the Pixel GUI using the D-Pad and the A/B buttons, its quite an interesting experience.
In terms of gaming – first I installed Quake 3 by following the instructions here and breaking out one of my copies of Quake 3:
It ran pretty slowly and was hard to use just only being able to look around and run back and forth, so next up, Minecraft!
Which also was fairly impossible to play – but the real reason for this is to try PUBG, right?
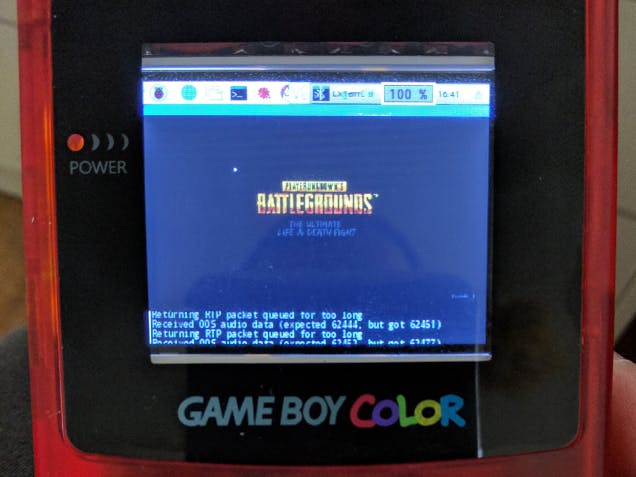
MoonlightingOf course the Pi can’t actually run PUBG (until the Pi 6 or something). So we have to stream it from a computer with an Nvidia graphics card. This is where Moonlight comes in, it will work with Gamestream from GeForce experience.
Follow the instructions here to get it set up with the PC/Pi. I made a ‘stream.sh’ file on the desktop to run it:
moonlight stream -width 320 -height 240 -fps 30 -localaudio -app steam –unsupported
Then I ran:
sudo chmod +x /home/pi/Desktop/stream.sh
So that it can be run just by double clicking on the file, perfect for the control scheme I’m using for the GBC Pi – when this is run it will load up Steam in big picture mode and allow you to select Player Unknowns Battlegrounds.
And away we go!Here’s a video of me attempting a few games on the Gameboy – no audio from the game unfortunately, need to find out why moonlight wasn’t playing ball here.
I wasn’t met with much success…
Things Learnt/Things to Improve- Get better tools
- Get better at putting things together and planning
- Figure out why moonlight wasn’t playing audio from the source PC
I think I’ll attempt this again with the above in mind and do the same with a Gameboy Advance – this should allow more room within the shell and also give me 2 extra buttons to use.
_0oE9kS1W7E.png?auto=compress%2Cformat&w=60&h=60&fit=min&dpr=2)


Comments